“Stumbling” no longer seemed appropriate as a description as to how I’ve been progressing through the Service Portal. So I’m switching it up to “slicing”, since I’m mowing down the requirements as they come in, no matter how unusual they may seem. Today’s agenda is modifying the catalog item form’s presentation.
If you’ve done a search on modifying “spModel” or “sp-model” in the community, you get some disappointing results. So either a lot of people know what I’m about to tell you and haven’t answered the question because they found it too trivial (doubtful), or no one has attempted it seriously yet (probable). Maybe not that many care or need to do it (most probable). But it became a requirement for me, so I had to start caring.
Currently, the portal catalog form looks like this OOB:
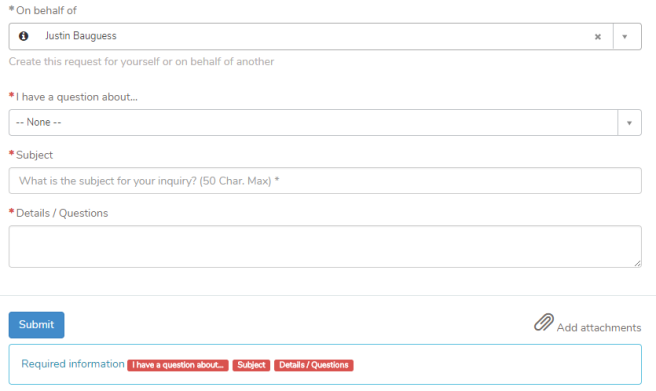
That’s not a bad look. But we needed it to look like this:
And no, the above picture is not the mock-up, it’s the real deal.
So how does one go about this? By digging, of course. I examined the “SC Catalog Item” widget, and noticed the “sp-model” and “sc-cat-item” directives. Of course, I couldn’t find those directives anywhere in the system. But, there’s a way around that. In the console, I typed “angular.element($0).controller(“sp-cat-item”)” and I received an object reference to the controller. I clicked through the object some until I found where this code was originating from: /scripts/js_includes_sp.js. If you go to your instance and append that after the .com, you’ll see the source for the angular portal scripts.
Great, but now what?
First things first, let’s clone the SC Catalog Item widget so we can play around with it. Next thing to do is to rename the directive for sp-model to something else. Let’s call it “my-sp-model” for the sake of this exercise.
Next, go to that source code and search for “spModel”. You’ll find the directive code. Copy that module code out, paste it into a UI Script, and rename the spModel to be mySpModel.
Next, we need to replace the “sp_model.xml” reference. If you’re on a Service Portal page, go into the Elements tab in the console and search for sp_model.xml. That’s the template our code is using. Copy that HTML template, add a property to spModel called “template”, paste the HTML into it, and remove the “templateUrl” property. (Note: I believe you could also use the sp_ng_template table to avoid copying the code into the javascript directly. However, my first attempt at this did not include that, since I discovered that table after completing this.)
Uh-oh. Looks like we need more directives. Now there’s an “sp-form-field” directive. Go back to your original source file and find “spFormField”. Rinse and repeat: copy the javascript, rename the directive (both in the HTML of mySpModel and in the new UI script), find the sp_form_field.xml, and copy it’s HTML into the mySpModel’s code.
We’re getting there, but there’s still a lot of work to do. Now for every field that you’re going to use/modify, we need to find which directive is controlling it:
- sn-field-reference -> Reference Fields
- sn-choice-list -> Select Boxes
- sp-date-picker -> Dates
There are, of course, others that may be of interest to you. I simply needed text fields, reference fields, and choice list fields for my modification.
In my case, in the sp_form_field template, I removed all the labels for text and reference fields. Now, users still need to identify the fields, of course. In my server script on the widget I copied, I added some code to the “if (data.sc_cat_item._fields)” block to add a placeholder attribute to the field object that was equal to the label. This is also a place where you can set a max_length attribute for a field. The default max_lengths cannot be set in any way that I could find.
A final touch (one that took the most time) was dealing with mandatory fields. I was instructed to remove the “Required Information” at the bottom, which normally housed our mandatory field list. Now we have to update the placeholder to have a “*” when the field is mandatory.
I accomplished this for choice fields by adding some code to the event handler for “spModel.gForm.initialized”, along with a variable that stores the choice boxes I want to check (and yes, I’d like to make this dynamic in the future). Why is this different than the normal mandatory asterisk addition code? The way choice lists (and references) are presented is much different. You’ll need to find the “span.select2-chosen” elements, and iterate through them. This is also where I do a check to make the text grey so it looks like a placeholder.
For every other field, I updated the “populateMandatory” function to add an asterisk to mandatory fields if one did not already exist.
There are many more things that can be done with this newfound ability to customize the catalog form. I’m sure I’ll eventually get around to playing with this more once this project starts to wrap up (or once someone requires something new on a different project).
For now, happy portaling.


Awesome article as this is what I’m trying to do right now. I’m a bit confused by your instruction for sp_model.xml though:
“Next, we need to replace the “sp_model.xml” reference. If you’re on a Service Portal page, go into the Elements tab in the console and search for sp_model.xml. That’s the template our code is using. Copy that HTML template, add a property to spModel called “template”, paste the HTML into it, and remove the “templateUrl” property.”
I found sp_model.xml in the elements tab and have copied it, where do I paste this code? Also, where do i add the new property and remove templateURL? Thanks!
Great work, i doesn’t need specifally this for may project but it is very instructive. Thanks for share/teach us.